Monday, 23 April 2012

TFS Error: The file file.xpo was not correctly imported to the model store in a previous synchronization. Any updates of the file is blocked from AX. Open Version Control, Synchronization log to re-import the file.


While working on TFS with Dynamics AX 2012, sometimes I get the following error when I try to check-out a certain file.
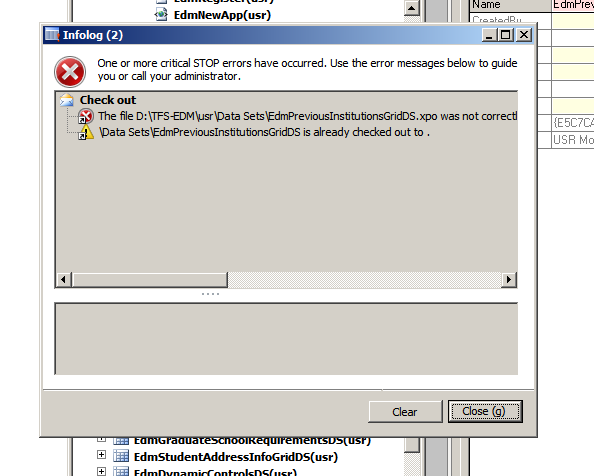


 This error occured because either you had synchronized your workspace with the files that were not in consistent state or you had checked-in your files which had some errors in .xpo code, like a node was missing etc.

 The complete error message is as follows:

 The file D:\TFS-EDM\usr\Data Sets\EdmPreviousInstitutionsGridDS.xpo was not correctly imported to the model store in a previous synchronization. Any updates of the file is blocked from AX. Open Version Control, Synchronization log to re-import the file.

To fix this error, open visual studio, go to Team Explorer (Menus-> View-> Team Explorer), and connect to your project with the TFS. After connecting to the project, just locate the file that you want to check out. Right click the file, and click "Check out for Edit". 


Now go back to AOT, right click on that file, and click "Undo Check-out". Now you can check this file out successfully by clicking on the file and clicking "Check-out".

Creating a Case with association using microsoft Dynamics ax

 In this post I will tell you how to create a simple case along with one association using x++.
In Microsoft Dynamics AX 2012, a “case” can be defined as an issue that needs a resolution. For eg, we have an education solution that provides students the facility to find a suitable university they wish to apply to. After a student gets registered in a certain university, a “Case” will be created. Same will be the scenario for a hospital management application when a patient gets admitted to the hospital and is treated by a doctor.
 You can use case management in Microsoft Dynamics AX and in Enterprise Portal for Microsoft Dynamics AX to record, update, track, follow up on, and close issues that are raised by your customers, vendors, or employees, or that are created through your audit processes. By planning, tracking, and analyzing cases, you can develop efficient resolutions that can be used for similar issues.
Tables involved:
The following tables are involved in case management:
CaseDetailBase (the base table through which other tables are derived)
CaseDetail  (the main table)
CaseLog (the log table. This is the table in which additional information is stored)
CaseAssociation ( any association of a case is stored in this table. For education management solution, a “Student” will be associated with the case. Likewise, for a hospital management solution, a “Patient” legal entity will be associated with the case and so on.)

To create a case with association using dynamics ax, create a class using AOT by right clicking on "Classes"-> "New Class" and add a suitable name to the class. I have named my class to EdmPostRegistrationEventsManager. Now add the two static methods to the class. One is for "Case" creation and another is for "Case Association" creation.

Here is the x++ code to create a case:

private static void createCase(RecId _studentId,
                              RecId _party,
                              NoYesId _isAssociationPrimary,
                              Notes _notes,
                              Description _description,
                              CaseCategoryRecId _caseCategoryRecId,
                              HierarchyName _processName,
                              CaseStatus _caseStatus,
                              RecId _prospectId=0
                              ){

    CaseDetailBase caseDetail;
    CaseId caseId;

    ttsBegin;


    if(CaseDetailBase::findByParty(_party).RecId==0){
    //generate the case id first.
    caseId = NumberSeq::newGetNum(smmParameters::numRefCaseId()).num();

    caseDetail.CaseId = caseId;

    caseDetail.Memo=_notes;

    CaseDetail.Description=_description;

    caseDetail.Party=_party;

    caseDetail.Process= _processName;

    caseDetail.CategoryRecId=_caseCategoryRecId;

    caseDetail.Status= _caseStatus;

    //insert the case.
    caseDetail.insert();

 
    //insert the case association(s).
    EdmPostRegistrationEventsManager::createCaseAssociation(CaseDetailBase::find(caseId).RecId,CaseEntityType::EdmStudent,_studentId,NoYes::No); 

    }

    ttsCommit;
}


And following is the method for creating a case association:

private static void createCaseAssociation(RecId _caseRecId,CaseEntityType _caseEntityType,RecId _refRecId,NoYesId _isAssociationPrimary){

    CaseAssociation caseAssociation;
    //insert the student association first.
    caseAssociation.EntityType = _caseEntityType;
    caseAssociation.RefRecId=_refRecId;
    caseAssociation.IsPrimary=_isAssociationPrimary;
    caseAssociation.CaseRecId=_caseRecId;
    caseAssociation.insert();
}
In Microsoft dynamics enterprise portal 2012, you can apply the range to the data sources in the init() method of the data set. But as far as I know, when the data sources are linked via active join (or some other join), then its not possible to apply the range through the dataset (may be its possible, but at least I did not find any help regarding this),  so I decided to apply the range  to one of the data sources.  Here are the steps:
  1.  Override the init() method of your datasource at which you want to apply the range.
         2.    Decorate the page_init method of your user control as follows:


Notice that "dsLeftMenus" is the name of the datasource which contains the dataset. 

        3. Now handle the CreatingDataSetRun event as follows:

  You can also send the enum values through EP like:


  Now go the AOT -> Data Sets-> DataSources-> Your datasource, and override the "init" method of your data source. Add the following x++ code to add the range to the data source. Notice that you can receive the argument which you sent through enterprise portal as follows:
       element.args().parm()    [will return "my value" in this case."]

public void init()
{
    //please be noted that QueryBuildDataSource and QueryBuildRange are declared just before super().    
   QueryBuildDataSource qbds;
    QueryBuildRange qbr;

    super();

    // Retrieve the data source.
    qbds = this.query().dataSourceName(this.name());

    // Clear the existing range.
    qbds.clearRange(fieldNum(HierarchyTreeTable,HierarchyId));

    // Add a new range to hierarchyId.
    qbr = qbds.addRange(fieldNum(HierarchyTreeTable,HierarchyId));
    qbr.value(queryValue(element.args().parm()));    //element.args().parm() will get the value from EP.
     
     //set the range status. We set it Hidden because we dont want to allow the user to modify it.
     qbr.status(RangeStatus::Hidden);
    
    //and execute the query.
    this.executeQuery();

}

Conclusion: In this article, we have explored how to send a parameter argument from EP to the dataset  and applied range to the data source according to that parameter.

If someone has a better solution to do so, I will be grateful to him if he shares with us.